Essential React Interview Questions and Answers for Freshers and Experienced
Discover essential React concepts, from JSX to state management, event handling, routing, and advanced techniques. Elevate your React skills today!
Introduction to React
Imagine you're building a user interface (UI) for a dynamic web application. Think about a single-page application (SPA) where content updates without reloading the entire page. This is where React shines.
React is a powerful, open-source JavaScript library specifically designed for creating reusable UI components. Consider it a Lego set for building complex UIs with modular, inter-connectable pieces. These components encapsulate data and functionality, promoting code maintainability and reusability.
But what makes React stand out? Here are some of its key features:
- Virtual DOM: React employs a virtual representation of the real DOM, enabling efficient updates without unnecessary browser manipulations. Bold this term for future reference. It essentially allows React to identify the minimal changes required in the actual DOM, optimizing performance.
- Unidirectional Data Flow: React enforces a unidirectional data flow, making your application's state easier to predict and manage. Data is passed down from parent components to child components through props (we'll discuss these later).
React's versatility extends beyond web development. With React Native, you can leverage the power of React to build native mobile applications for iOS and Android, offering a unified codebase for both platforms.
This is just a glimpse into the world of React. As we delve deeper, you'll discover how JSX simplifies component creation, explore the different types of components, and unlock the power of state management and hooks.
Stay tuned for the next section where we'll dive into the world of JSX!
Understanding JSX

Ever wished you could write HTML directly within your JavaScript code for React components? Well, with JSX (JavaScript XML), that dream becomes a reality. JSX is a syntax extension that allows you to write HTML-like structures within your JavaScript code. While not technically HTML itself, JSX gets transpiled (converted) to plain JavaScript functions that React understands.
Think of JSX as a shortcut for creating React elements. It improves readability and maintainability of your code, especially when dealing with complex UI structures. Here's an example of using JSX:
JavaScript
const element = <h1>Hello, world!</h1>;
This simple line of code creates a React element representing an HTML heading (h1) with the text "Hello, world!". Pretty neat, right?
But there's a catch: JSX needs to be transpiled before browsers can understand it. This is typically done during the build process using tools like Babel. Don't worry, these tools handle the conversion seamlessly behind the scenes.
Components in React
Let’s say you’re constructing a building. You wouldn't build the entire structure with a single block, would you? No, you'd break it down into manageable sections like walls, doors, and windows. In React, this modular approach is embodied by components.
Components are the fundamental building blocks of React applications. They are reusable pieces of code that encapsulate UI logic and data. Each component defines how a specific part of your UI should look and behave. This modularity fosters code organization, maintainability, and reusability.
React offers two primary ways to create components:
- Functional Components: Functional components, once known for simplicity, are now power players in React thanks to Hooks (introduced in React 16.8). These lightweight components (functions returning JSX) can now handle state and side effects, blurring the lines between functional and class components for complexity. They remain a great choice for building modern React applications.
- Class Components: While less common in modern React with the introduction of Hooks (covered later), class components offer more flexibility for complex components that require state management or lifecycle methods. They are defined using JavaScript classes that extend the React.Component class.
Here's a breakdown of the key differences between functional and class components:
Styling in React
Just like a well-dressed website is more visually appealing, styling is crucial for crafting an engaging user experience in your React applications. React offers several approaches to style your components, allowing you to choose the method that best suits your project's needs and preferences. Here are the main methods:
- Inline Styles: Inline styles can be directly applied within JSX elements using the style attribute. This approach is convenient for quick styling adjustments but can become cumbersome for complex styles or managing styles across multiple components.
- External Stylesheets: For better organization and maintainability, external stylesheets are a popular choice. You can create separate CSS files containing your styles and import them into your React components using techniques like import statements or loaders.
- CSS-in-JS Libraries: Libraries like Styled-Components or Emotion allow you to write CSS directly within your JavaScript code using template literals. This approach promotes tight coupling between styles and components, improving maintainability and reusability, especially for complex styling scenarios.
The choice of styling method depends on your project's specific needs and preferences. For smaller projects with simpler styling requirements, inline styles might suffice.
As your application grows and styling becomes more complex, external stylesheets or CSS-in-JS libraries offer better organization and maintainability.
But what's a great UI without some style? Let’s talk about making things pretty in React.
State and Props in React
Imagine building a to-do list application. You need to track the list of tasks and their completion status. This is where state and props come into play in React, acting as the cornerstones of data management within your components.
- Props: Props are read-only properties that are passed down from parent components to child components. They act as a way to provide data to child components, allowing them to render their UI based on the received information. Think of props as arguments you pass to a function, but in this case, the function is your React component.
Here's an example:
JavaScript
function Task(props) {
return (
<li>
{props.text} - {props.completed ? "Completed" : "Pending"}
</li>
);
}
In this example, the Task component receives two props: text (containing the task description) and completed (indicating whether the task is finished). The component uses these props to display the task details.
- State: Unlike props, state is a component's internal data that can be changed over time. It allows components to react to user interactions or events and update their UI accordingly. Think of state as the internal memory of a component, holding dynamic data specific to that component.
Here's how you might manage state in a functional component using the useState Hook (covered later):
JavaScript
function TodoList() {
const [tasks, setTasks] = useState([]); // Initialize state with an empty tasks array
// Function to add a new task
const addTask = (text) => {
setTasks([...tasks, { text, completed: false }]); // Update state with new task
};
// ... rest of the component logic
}
In this example, the TodoList component manages its state using the tasks array, which holds information about each task. The addTask function updates the state by adding a new task object to the tasks array.
Here's a table summarizing the differences between state and props:
State and props work together to establish a clear data flow within your React application. Props provide a one-way communication channel from parent to child components, while state enables individual components to manage their internal data and update their UI dynamically.
Got the looks down? Great! Now let's get into the brains of the operation - state and props.
Handling Events in React
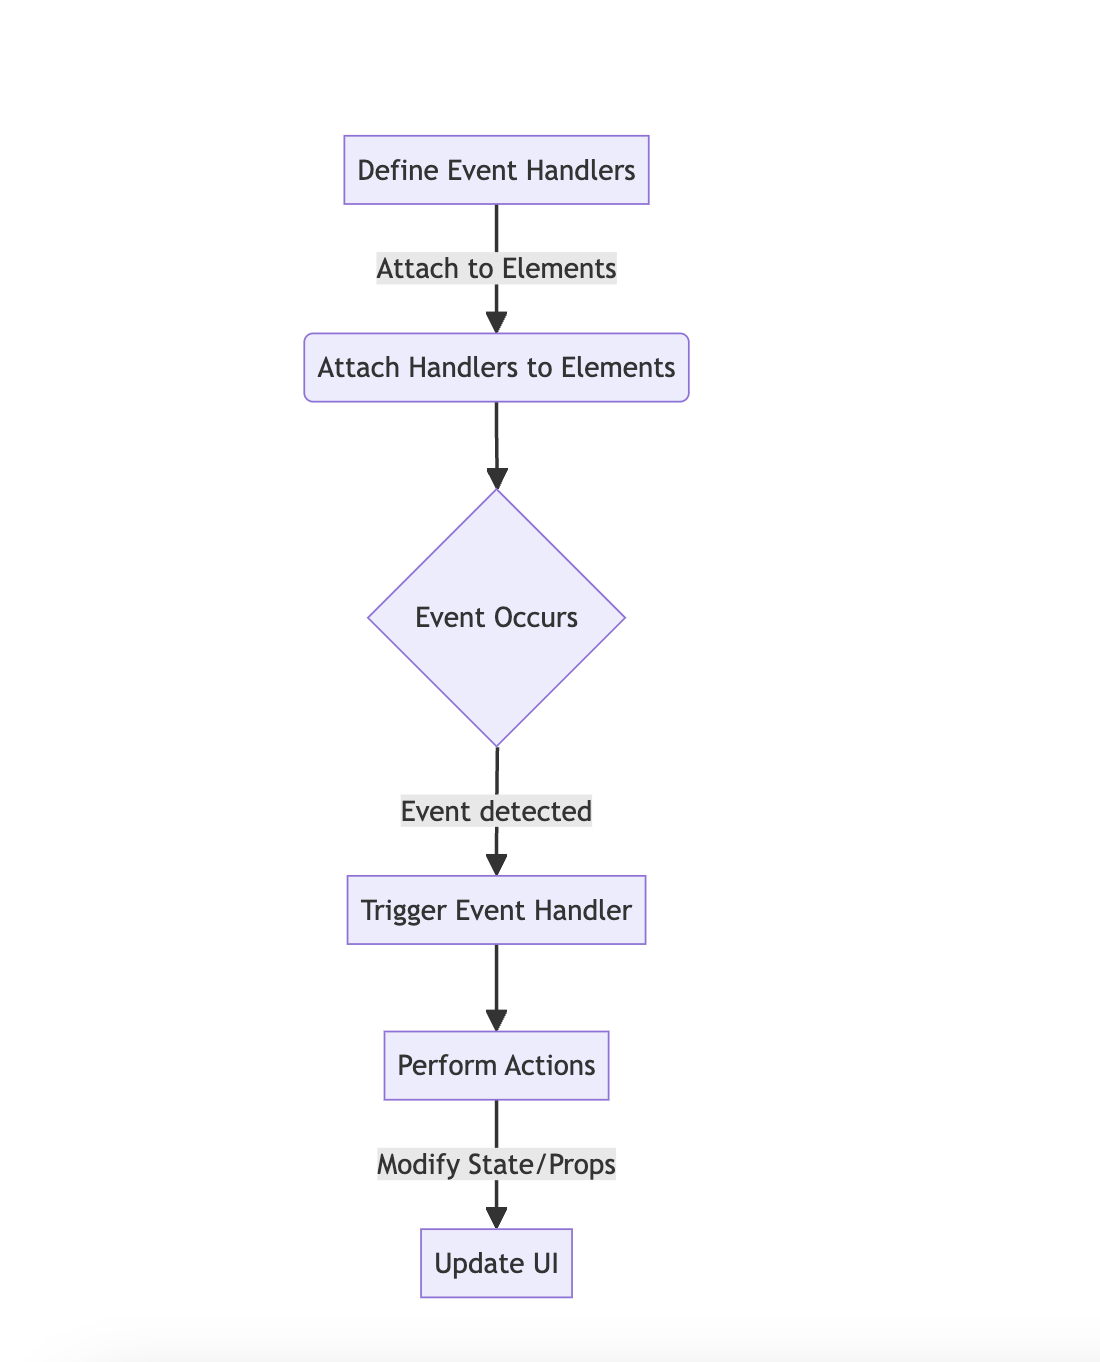
Your React application wouldn't be very interactive without the ability to respond to user actions. This is where event handling comes in. Events are signals that indicate something has happened, such as a user clicking a button, typing in a form, or hovering over an element. React provides a robust system for handling these events within your components.
Here's a breakdown of how event handling works in React:
- Define Event Handlers: You create functions that will be executed when a specific event occurs. These functions typically take an event object as an argument, which provides details about the event (e.g., what element was clicked, what key was pressed).
- Attach Handlers to Elements: You connect your event handler functions to specific DOM elements within your JSX using special attributes like onClick, onChange, onMouseOver, and so on. These attributes specify the event type and the function that should be called when the event happens.
Here's an example of handling a button click event in a functional component:
JavaScript
function Button(props) {
const handleClick = () => {
alert("Button clicked!");
};
return (
<button onClick={handleClick}>Click me</button>
);
}
In this example, the handleClick function is defined to handle the button click. The onClick attribute on the button element associates the handleClick function with the click event. When the user clicks the button, the handleClick function gets triggered.
Event handling allows you to create dynamic and interactive user experiences within your React applications. By responding to user interactions, you can update the UI, fetch data, or perform other actions based on user input.
Making things pretty is one thing, but how about making them interactive? Enter event handling.
React Router and Navigation
Imagine a complex single-page application (SPA) built with React. Transitions between different sections or views would likely involve complex state management or workarounds. This is where React Router steps in, providing a streamlined solution for handling navigation within your React applications.
React Router is a popular library built specifically for managing routing in React applications. It offers a declarative way to define routes and components that correspond to different parts (or "views") of your application. This approach simplifies navigation logic and promotes better code organization.
Here's a glimpse into what React Router offers:
- Route Components: You define React components that represent different views or sections of your application.
- Declarative Routing: You configure routes using a declarative syntax, specifying the URL path and the component that should be rendered for that path.
- Navigation Links: React Router provides components like Link that allow you to create user-friendly navigation elements within your application. These links handle navigation programmatically, updating the URL and rendering the appropriate component based on the selected route.
State Management with Redux
Ever worked on a complex React application where managing state across multiple components became cumbersome? As your application grows, keeping track of state updates and ensuring consistency can become a challenge. This is where Redux comes in as a powerful solution for centralized state management.
Redux is a predictable state container library for JavaScript applications, particularly well-suited for React projects. It provides a centralized store for managing your application's state, offering a single source of truth for data and simplifying state updates.
Here are some key benefits of using Redux in your React applications:
- Centralized State: Redux stores your application's entire state in a single, immutable object. This promotes consistency and simplifies debugging by providing a clear picture of your application's state at any given time.
- Predictable Updates: Redux enforces a unidirectional data flow through reducers, which are pure functions that take the current state and an action object (representing the change) and return the new state. This predictability makes reasoning about state changes and debugging easier.
- Improved Testability: By isolating state management in Redux, you can write unit tests for your reducers in isolation, enhancing the overall testability of your application.
When to Use Redux:
While React's built-in state management mechanisms (this.state for class components and useState hook for functional components) are valuable, Redux shines in complex applications. If managing state across numerous components becomes cumbersome, or if you prioritize centralized state management, Redux becomes a compelling choice.
In essence, Redux offers a powerful solution for state management in complex React applications, promoting consistency, predictable updates, and improved testability.
Feeling confident? Let's push the boundaries with some advanced React concepts!
Advanced Concepts
As you delve deeper into React development, you'll encounter a range of advanced concepts that empower you to build more efficient and scalable applications. Here, we'll explore some of these powerful techniques:
- Higher-Order Components (HOCs): Imagine a reusable pattern for adding functionality to existing components without modifying their code directly. That's the essence of HOCs. They are functions that take a component and return a new component, often adding features like authentication, logging, or data fetching. HOCs promote code reusability and maintainability by encapsulating common functionalities.
- Keys and Refs: React relies on virtual DOM for efficient updates. However, assigning unique keys to elements in lists helps React identify which items have changed, added, or removed. Keys improve rendering performance and ensure correct updates. Additionally, refs provide a way to directly access DOM elements created by React components. This can be useful for focusing an input field or integrating with third-party libraries.
- Optimizing Performance: While React excels at rendering, maintaining smooth performance is crucial for a positive user experience. Techniques like code splitting, lazy loading, and memoization can be employed to optimize React applications. Additionally, understanding the virtual DOM and its impact on performance is essential for efficient React development.
These advanced concepts empower you to craft high-performing, well-structured React applications. By leveraging HOCs for code reuse, utilizing keys and refs effectively, and implementing performance optimization strategies, you can take your React development skills to the next level.
React Hooks
Ever coded yourself into a corner with complex class components in React, struggling to manage state and side effects? Well, sweat no more! React Hooks swoop in like a knight in shining armor, offering a simpler and more concise way to tackle these challenges within functional components.
Introduced in React 16.8, Hooks provide a set of functions that let you "hook into" React features like state, lifecycle methods, and context directly from functional components. This eliminates the need for class components in many scenarios, streamlining your code and making it easier to reason about.
Here's a taste of what Hooks bring to the table:
- useState Hook: Tired of juggling with this.state in class components? The useState Hook empowers you to manage component state directly within functional components. Think of it like a built-in state variable that you can update as needed.
- useEffect Hook: Side effects like data fetching, subscriptions, or timers can get messy in class components with lifecycle methods. The useEffect Hook simplifies this by allowing you to declare side effects within your functional components. Gone are the days of worrying about componentDidMount or componentWillUnmount.
With Hooks, functional components can now compete with class components in terms of functionality, offering a cleaner and more enjoyable development experience. But wait, there's more! Hooks are composable, meaning you can combine multiple Hooks within a single component to achieve complex logic. This modular approach promotes code reusability and maintainability.
Unleashing Power with Custom Hooks:
React Hooks don't stop at built-in functionality. They allow you to create your own custom Hooks! These are reusable functions that start with "use" (e.g., useFetch, useForm). They can encapsulate complex logic that you can share across different components.
Imagine a useFetch Hook that handles fetching data from an API. It would manage the fetch logic using useState and useEffect internally, and return the fetched data and error state for your component to consume. This promotes cleaner and more organized code. You can create custom Hooks for various functionalities, like managing forms, authentication, or subscriptions, keeping your components focused and reusable.
By leveraging both built-in Hooks and custom Hooks, you can build React applications with a clear separation of concerns, improved maintainability, and a more enjoyable development experience.
Thought React couldn’t get any better? The Context API and other modern features beg to differ.
Modern React Features: Context and Beyond
React's ecosystem is constantly evolving, offering new features and tools to streamline development. Let's explore some of these modern features that can elevate your React projects:
- Context: Imagine a scenario where you need to share data across multiple, deeply nested components in your React application. Prop drilling, the traditional method of passing props down the component tree, can quickly become cumbersome and error-prone. This is where Context shines.
Context provides a way to establish a global state management system specifically within your React application. You can create a context using React.createContext, and components can access and consume the context value using the useContext Hook. This approach simplifies data sharing and promotes better code organization, especially for frequently used application-wide data.
- StrictMode: Ever wish you had a built-in assistant to catch potential issues in your React code during development? StrictMode is just that! It's a special development mode that identifies deprecated usage patterns, legacy component APIs, and other potential problems in your React application. By enabling StrictMode, you can proactively address these issues and ensure your code adheres to modern React best practices.
These modern features are just a glimpse of what React offers to enhance your development experience. Context streamlines data sharing, while StrictMode acts as a development guardian, helping you write cleaner and more future-proof React code.
Styling and Performance Optimization in React
Creating a visually appealing and performant React application requires a strategic approach to styling and optimization. Here, we'll delve into these crucial aspects:
Styling Approaches:
React offers several ways to style your components, each with its own advantages and use cases. Let's explore the common methods:
- Inline Styles: While convenient for quick adjustments, inline styles can become cumbersome for complex styles or managing styles across components.
- External Stylesheets: For better organization and maintainability, external stylesheets are a popular choice. You can create separate CSS files containing your styles and import them into your React components.
- CSS-in-JS Libraries: Libraries like Styled-Components or Emotion allow you to write CSS directly within your JavaScript code. This approach promotes tight coupling between styles and components, improving maintainability and reusability for intricate styling scenarios.
Choosing the right styling method depends on your project's complexity and preferences. For smaller projects with simpler styling needs, inline styles might suffice.
As your application grows, external stylesheets or CSS-in-JS libraries offer better organization and maintainability.
Performance Optimization Strategies:
A smooth and responsive user experience is paramount for any web application. React's virtual DOM plays a crucial role in optimizing performance by minimizing unnecessary DOM manipulations. Here are some additional strategies to consider:
- Code Splitting: Break down your application code into smaller bundles that can be loaded on demand. This reduces the initial load time and improves perceived performance.
- Lazy Loading: Load components only when they are needed, further enhancing initial load time and optimizing resource usage.
- Memoization: This technique involves caching the results of expensive functions to avoid redundant computations. It can be particularly beneficial for components that perform complex calculations or rely on heavy data fetching.
Now, for the seasoned pros, let's delve into the nuances that set React apart in the tech landscape.
Additional Concepts for Experienced Developers
As you graduate to the realm of experienced React developers, a deeper understanding of certain concepts becomes instrumental. Here, we'll delve into two key areas:
Architectural Differences: React (Library) vs. Angular (Framework)
While both React and Angular are popular choices for front-end development, they take fundamentally different approaches. Here's a breakdown of their architectural distinctions:
- Philosophy: React is a JavaScript library that focuses on building reusable UI components. It offers greater flexibility in terms of tooling and structure, allowing developers to choose their preferred libraries and patterns. Angular, on the other hand, is a more opinionated framework that enforces a specific structure and set of tools. This can streamline development but might limit flexibility for some projects.
- Data Binding: React employs a unidirectional data flow, where data is passed down from parent to child components through props. This approach offers better predictability and easier debugging. Angular utilizes a two-way data binding mechanism, where changes in the UI automatically update the model and vice versa. While convenient, it can make complex applications harder to reason about.
- Templating: React uses JSX for component creation, allowing you to write HTML-like structures within your JavaScript code. Angular leverages its own templating language, offering more control over the DOM manipulation process.
Ultimately, the choice between React and Angular depends on project requirements and team preferences. React's flexibility and focus on UI components make it a great choice for building user interfaces and single-page applications. Angular's structure and built-in features can be advantageous for large-scale enterprise applications with complex data flows.
Accessibility in React Applications
In today's digital landscape, ensuring your React applications are accessible to users with disabilities is not just a best practice; it's a necessity. Here's how you can prioritize accessibility in your development process:
- Semantic HTML: Utilize semantic HTML elements like <h1> for headings, <button> for buttons, and <li> for list items. This conveys the meaning and purpose of elements to assistive technologies used by people with disabilities.
- Keyboard Navigation: Ensure your application is fully navigable using the keyboard. This allows users who cannot use a mouse to interact with your UI elements effectively.
- Focus Management: Manage focus states within your React components to indicate which element is currently in focus. This provides clear guidance for users navigating your application with a keyboard.
- ARIA Attributes: Leverage ARIA (Accessible Rich Internet Applications) attributes to provide additional information about your UI elements to assistive technologies. This can include details like landmarks, live regions, and relationships between elements.
By incorporating these accessibility considerations into your React development workflow, you can create inclusive applications that cater to a wider audience.
Ready to take your React development skills to the next level and land your dream engineering job? Weekday Works can help! Our innovative platform leverages the power of your network to connect you with exciting opportunities. Sharpen your React skills and head over to https://www.weekday.works/ to explore how our can accelerate your engineering career.

.png)